
As with most recent Football Managers for you to make certain changes in Football Manager 2019 you need to create a new skin. Thankfully over the last few years some more stuff has been moved out of the skins folder so you only really need the Base skin if you are wanting to edit the skin graphics, fonts or colours. If you want to edit the match graphics or the most of the panel xml files you no longer need really need the base skins.
So to make things easier for people I've put up some base skins that are identical to the default skins that come with the game, so you can add new files/graphics to these without messing up the original skins, and anything that isn't located in these new skin folders will be taken from the default locations within the game.
For Football Manager 2019 you have three skins to choose from the Default skin, the Light skin and the Dark skin.
Base2019 Skin - This is the Default skin and is based on the Default Football Manager Skin.
Base2019 Dark Skin - This is the Dark Base Skin and is based on the Football Manager Dark Skin.
Base2019 Light Skin - This is the Light Base Skin and is based on the Football Manager Light Skin.
NOTE: These are based on the Pre-Release Beta files at the moment so things are likely to change between now and release, however unless something major comes up I'll likely just update them with the Release Version files rather than with each Beta update.
Install Instructions:
When you extract the file you have downloaded you should have one folder (with a name starting base19...) and a readme.txt file.
Now copy the folder into your skins folder within your User Data Location, by default this is:
For Windows:
C:\Users\[Your Windows Username]\Documents\Sports Interactive\Football Manager 2019\
For Mac:
/Users/[Your Mac Username]/Documents/Sports Interactive/Football Manager 2019/
For Linux:
/home/documents/Sports Interactive/Football Manager 2019/
If done right your skins folder should look something like this:
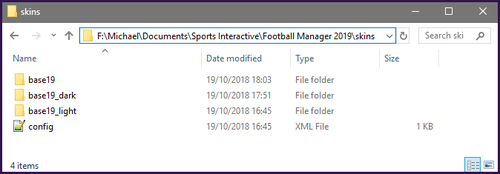
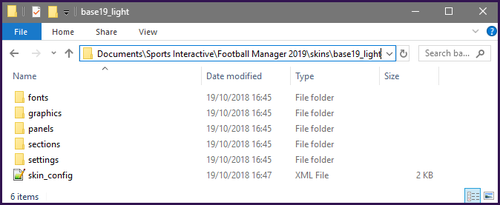
And inside for example the base19_light folder you should have the following folders:
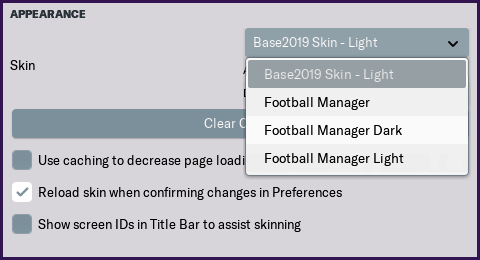
When you load the game up if the skin cache is off any skins in the skins folder should appear in the skins menu like the below image:
NOTE: FMT skins will only appear when you are playing the FMT mode and normal skins will only appear when playing the normal mode.
If the skin cache is on you'll need to turn it off, exit the Preferences menu and re-enter it and any new skins should appear, if not tick 'Always Reload Skin on Confirm' and change skins, click confirm and go back in and your skin should appear.
How To Stop the Blurring Effect when Processing
FM2016 introduced a new feature where when the main screen isn't the focus of the screen it blurs out, however if you don't like this effect it is simple enough to disable it, to do this simply browse to the following location within the Base Skin you are using:
\graphics\boxes\dialog\background
Inside will be a paper.xml file open that and locate this line:
<boolean id="blurred" value="true"/>
and change it to read:
<boolean id="blurred" value="false"/>
How To enable Background Changes
Whilst FM19 directly supports background changes this year the default graphics aren't transparent enough to see the background in most places so unfortunately you'll need to wait for someone to make a custom skin that supports backgrounds.
To Edit the Fonts
The font settings are now controlled by the various files located inside the fonts folder. For the base skins I have included all the default font files to save you having to go look for them. To edit the fonts its just a case of changing the various variables declared in the xml files, whilst to change the actual font you copy the font you want to use to the font folder and then update the font names in the xml files to match your new font.
To Edit the Font Colours
The colour settings for each skin are controlled by the settings.xml file located inside the settings folder.
For the base skins I have copied in the relevant coding for you to change the various colours used by the skin – you just need to open the settings.xml file and locate the relevant line for the colour setting you wish to change – the colour names and comments should explain what the majority of the colours control.
The colours are declared in RGB values, that range from 0-255 where Red=255 Green=255 Blue=255 is white and Red=0 Green=0 Blue=0 is black.
To locate the RGB value of a colour you want to use you can either use a image editing program to obtain the RGB Value of the colour or type rgb values into google and it will bring up several websites that list the RGB Values for various colours.
Note that whilst this file contains most of the text colour settings, some items are hard-coded, others are determined by the individual xml files and some others are set by the xml files in the fonts folder.
Also if you have the Skin Cache on you can change some of the colours directly through the game from the Preferences -> Interface-> Skin Colours screen
How to Recolour the Game Colours
Like with the font colours these are now controlled via the files found in the settings folder, and are changed in the same way as the font colours.
For the base skins I have copied in the relevant coding for you to change the various colours used by the skin – you just need to open the settings.xml file and locate the relevant line for the colour setting you wish to change – the colour names and comments should explain what the majority of the colours control.
For your changes to take affect
If you have made any changes to the base skins (colours, fonts, graphics) to get your changes to show you’ll need to go into the Preferences -> Interface Menu and untick ‘Use caching to decrease page loading times’ if it is ticked and then tick ‘Reload skin when confirming changes in Preferences’ then click confirm and your changes should be applied, if you have previously ticked and unticked the required boxes a 'Reload Skin' button should appear in the bottom left corner, if this button appears you can click that if the Confirm Button is greyed out.
---
You are free to do what you want (apart from upload to Steam Workshop as I'll upload them) with these Base Skins provided:
1. They are not sold or behind a paywall.
2. You don't advertise them as being exclusive to your website.
3. My username and blog address are included: http://michaeltmurrayuk.blogspot.co.uk/

- Date Created
- 23 Oct 2018 19:40:09
- Date Updated
- 23 Oct 2018 19:40:09
- Last Comment
- 10 May 2019 13:06:44
Comments
You'll need to Login to comment
nachopincha